how SSL/TLS works
22 Aug 2021 | categories: internet protocols
prev: git revisions
The internet is madness, information flying everywhere and it’s full of bellends who want to do bad things. A big portion of those people would love to see what you’re doing online and for the most part we aren’t doing anything interesting, perhaps browsing reddit or doomscrolling on Twitter.
There are times when you do want some privacy though. Perhaps you’re checking your bank balance or maybe you would like to log into a website so you need to send your password. Hell even if you aren’t sending sensitive information it would be nice just having some privacy and not have some dork with a computer science degree reading what you and your friend are talking about online.
This is what SSL/TLS helps with, it encrypts your connections when speaking to websites so only your computer and the server can make sense of what’s being sent across the internet.
That’s it, easy! Alright see you in another 10 months for the next post.
Oh, you want more than that? Alright then, let’s dive into this shit show.
terminology
Before I delight you with a short history it’ll be good to clear up a common source of confusion with this subject. What are these two seemingly connected initialisms: SSL/TLS? Not to worry I have answers:
- SSL - Secure Sockets Layer
- TLS - Transport Layer Security
You would be in good company if you think these are two different things but in reality they are pretty much the same thing. All will become a little clearer with a history lesson.
history class
If you’ve used a computer you will no doubt have heard of HTTP, it is a protocol that is used to request and send content over the internet. This protocol was created in 1991 and it did the job however it sends everything in plain text, in other words if someone is sitting sniffing packets on the network they can see what you’re sending and receiving.
Using some software like Wireshark I’ll show you what I mean, Wireshark will let us look at packets on a network. I’ve sent an HTTP request to fetch this exact post from the server running on my machine that I am using as I write this post, and using Wireshark I’ve singled out the request.
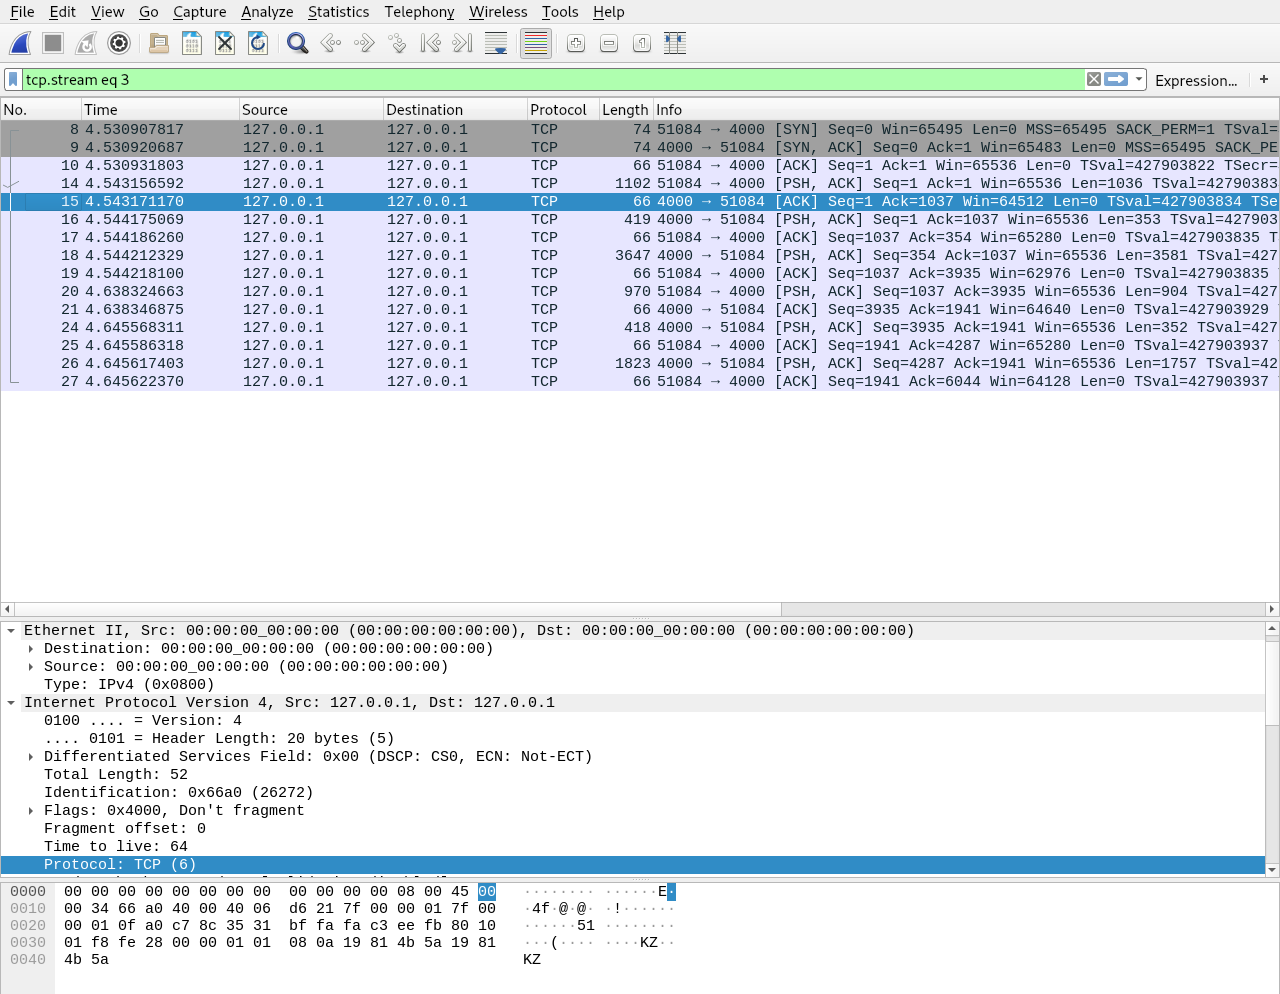
Each line there is a TCP message so if I click on one of them I should see the data the packet is carrying in the bottom section.
The bottom section has the bytes on the left and the ASCII representation of those bytes on the right, it’s a little crowded but you can see exactly what the server has sent back to me. You can probably understand how this is a problem if you’re sending credit card information or passwords in your HTTP requests, anyone looking at packets on the internet could see what you’re up to.
SSL to the rescue!
Luckily in the 90s other people saw this security flaw too and they got to work trying to fix it, some smart cookies at Netscape came up with Secure Sockets Layer which would encrypt messages being sent online. To use it all you had to do was replace HTTP with HTTPS in the URL. As nice as this all sounds SSL was chock full of security flaws and version 1.0 was never released. Nice work.
They went back to the drawing board and in 1995 version 2.0 was released, hurray! A valiant effort but it also contained a ton of security flaws so they completely redesigned it and released version 3.0 in 1996. They got there in the end.
what’s TLS then?
This is where Transport Layer Security makes its appearance. Considering SSL was quite an important development in internet security it was picked up by the Internet Engineering Task Force (IEFT) who would manage it from then on.
The next version of SSL was rebranded as TLS so the IEFT wasn’t seen to just be passing off Netscape’s work as their own, the new name would show it was under new management. In 1999 TLS version 1.0 was released, in reality it was just SSL 3.1 but with a shiny new name and some new clothes.
Fast forward to present day and we are now up to TLS 1.3 and every SSL and TLS version up to TLS 1.2 has been deprecated due to various security flaws, the exact details aren’t important in this post so let’s move on.
HTTPS
A large portion of the internet now uses TLS and modern browsers show a little padlock icon in the URL bar so you know you’re communicating with the site using TLS. There’s a little more to this icon regarding TLS Certificates but I’ll circle back to this topic later.

This appears when you visit a site using the HTTPS instead of HTTP. HTTPS is an extension of HTTP and it means HTTP over SSL, it was created back in 1995 with SSL 1.0.
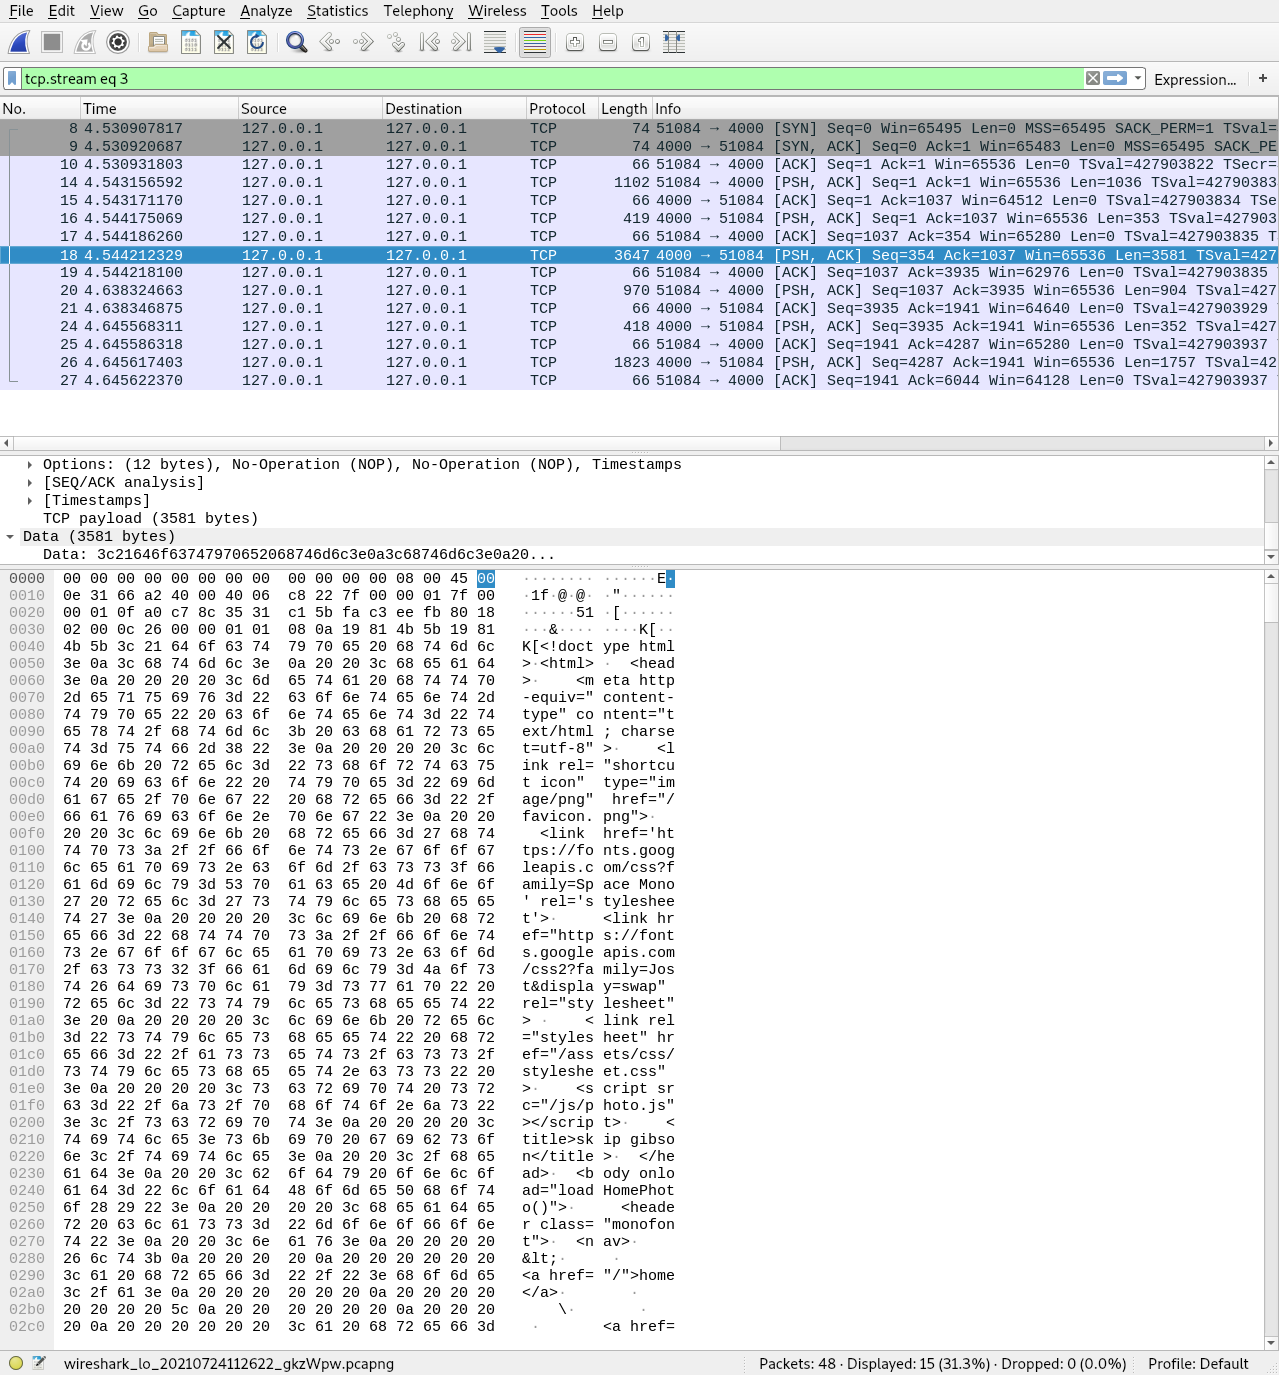
A little demonstration to show you the encrypted messages would be good. I’ll
visit a website using https:// and capture the traffic using Wireshark. Here
is the captured TCP stream:
There are a couple of differences between this https request and the earlier
http one, firstly the http messages were all using the TCP protocol
whereas here you can see some TLSv1.3 messages. I’ll dive deeper into what
those TLS messages are doing later.
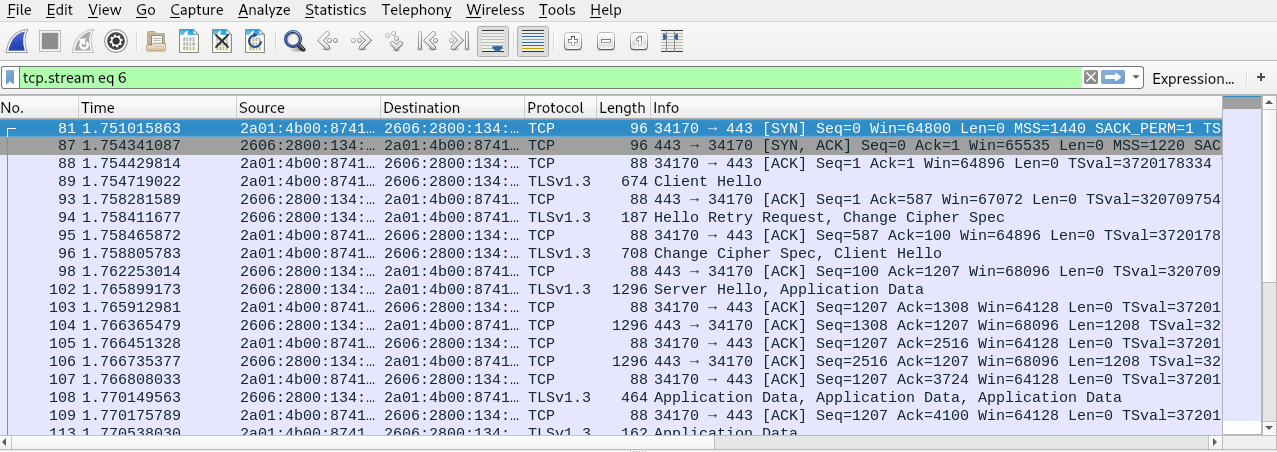
If we scroll down to the next section and look at a packet we can see the
destination port number, in other words the port my computer is sending data to,
is 443 when using https instead of port 80 which is used for http.
Servers expect https traffic on port 443.

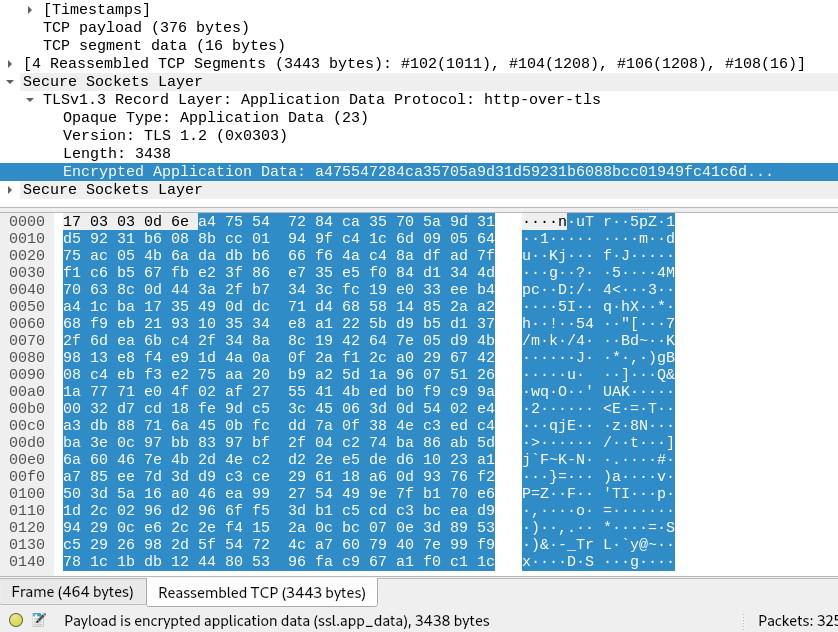
Now if we find and highlight the data being transmitted we can see it’s encrypted and I’m unable to make sense of it. Perfect.
other protocols
I’ve been focusing primarily on HTTPS but TLS is protocol agnostic and is used with plenty of other protocols to provide security through encryption. Here’s a short list of other protocols it’s used with:
- SMTPS - Simple Mail Transfer Protocol over SSL/TLS
- FTPS - File Transfer Protocol over SSL/TLS
- LDAPS - Lightweight Directory Access Protocol over SSL/TLS
With these examples, just like with HTTP, TLS was added later so there are
unencrypted forms of these protocols. To find the original protocol just remove
the S suffix.
how does TLS work?
To explain how it works in practice let’s walk through the handshake process for HTTPS, we can take little detours as topics come up. The following is based on TLS version 1.2, version 1.3 does the handshake slightly differently but don’t worry I’ll cover that later.
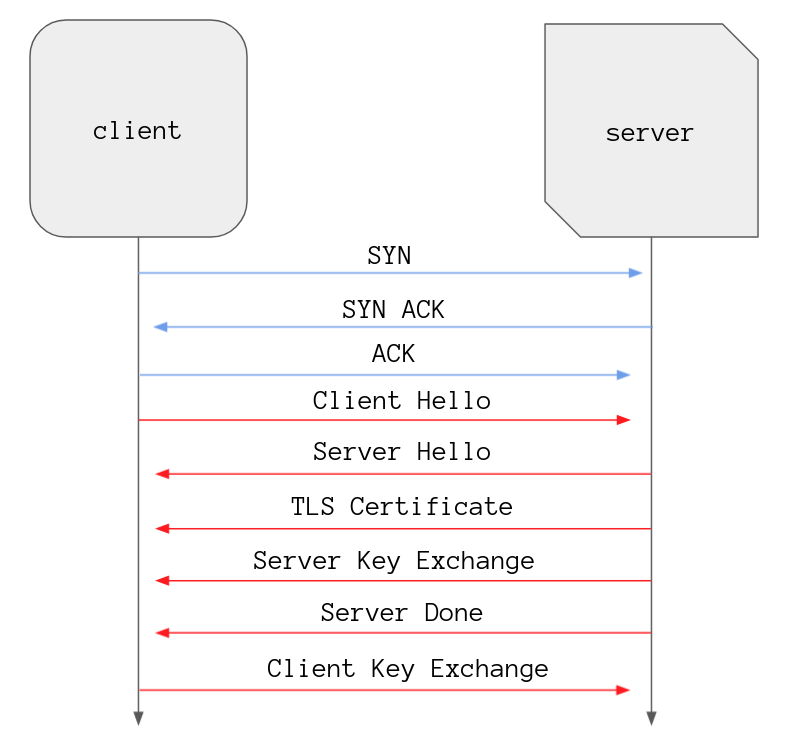
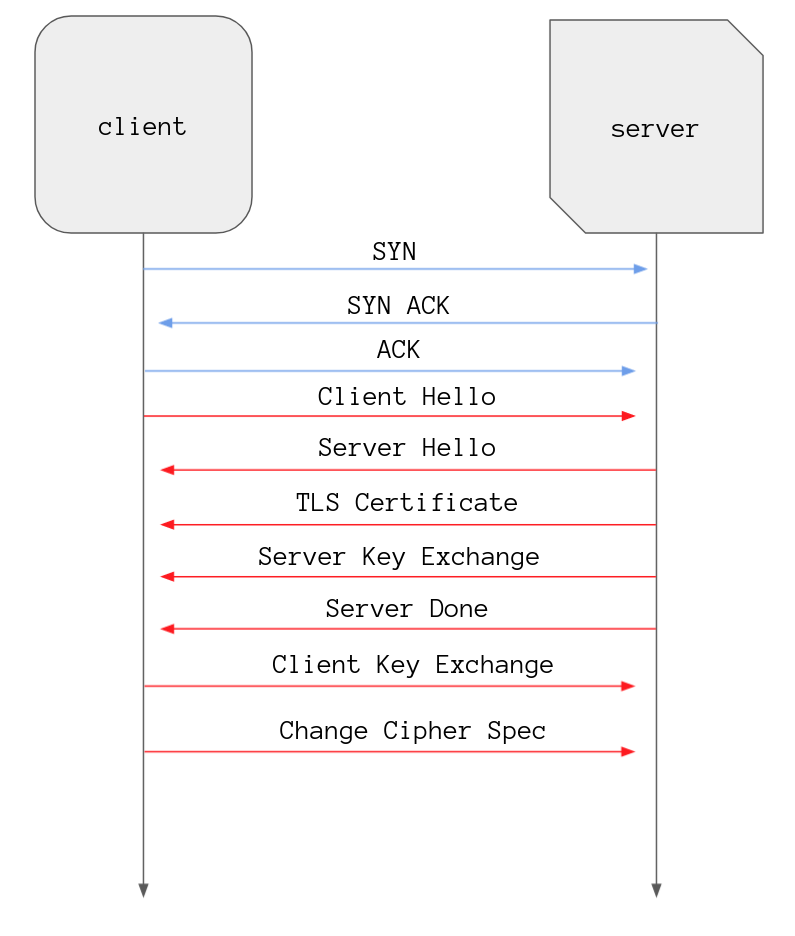
To start off a client and a server go through a 3 way TCP handshake in order to set up a connection between them, the ins and outs of a TCP handshake aren’t important in this post.
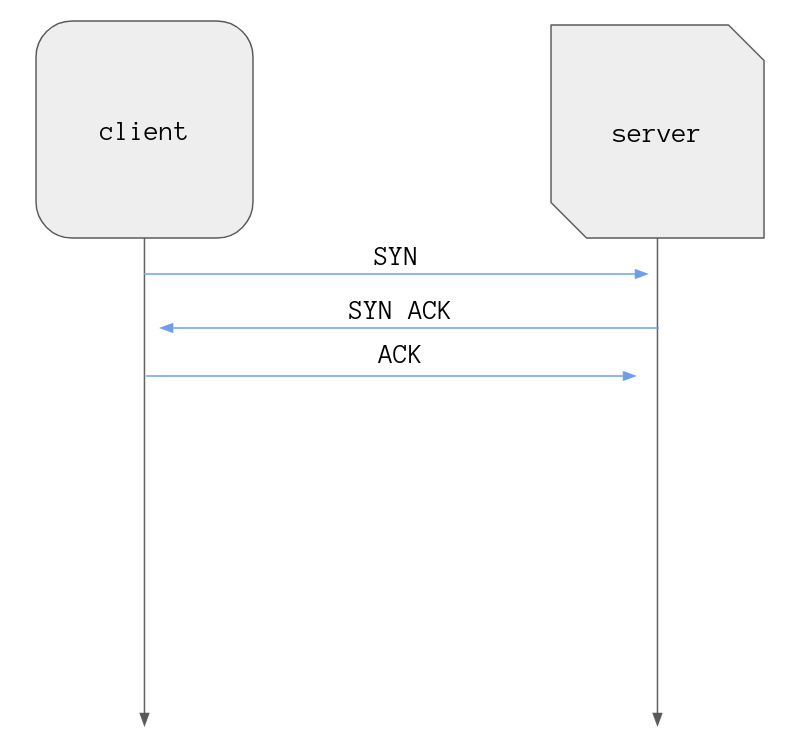
Three messages later and we have a connection the client then initiates the TLS
handshake by sending a Client Hello message.
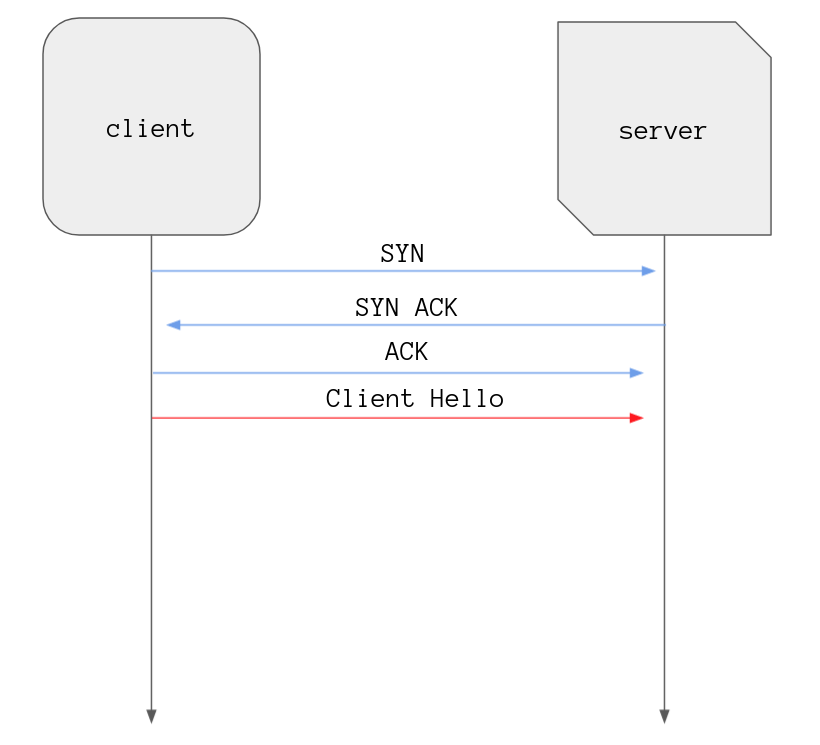
The message includes the maximum version of TLS it supports, a list of cipher suites, and a random string of bytes known as “client random”.
Here is an example of a cipher suite that might appear in a TLS 1.2 message:
TLS_DHE_RSA_WITH_AES_128_GCM_SHA256
Breaking that down:
TLS- the security protocol, obviously.DHE- the key exchange algorithm, in this case Diffie-Hellman Ephemeral.RSA- the public key authentication method.AES- the algorithm used for the symmetric encryption.128- the key size used by the encryption algorithm above.GCM- the mode that the algorithm should be used in, in this case it’s Galois/Counter ModeSHA256- the hashing algorithm used to compute digital signatures (again, more to follow)
If a lot of that doesn’t make sense that’s okay, I’ll be covering the majority of it as we progress.
Based on the information in the Client Hello message the server has to make a
couple of decisions such as which version of TLS and which cipher suite to use.
It also creates a random string of bytes known as the “server random” and the
server wraps this information up with a big bow along with some other values and
lovingly sends it over to the client, this is the Server Hello message.
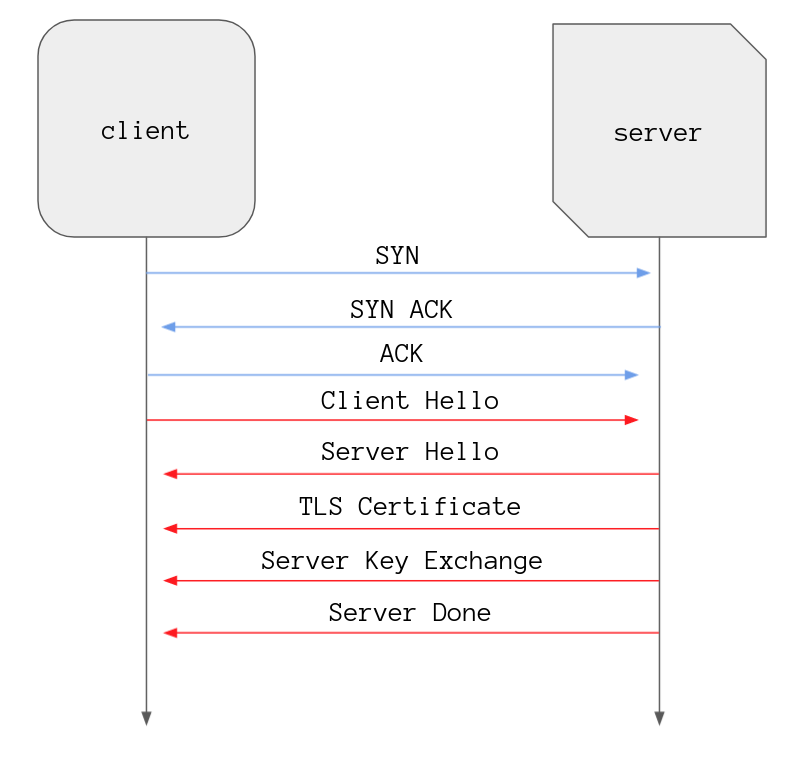
As you can see a couple of other messages are sent by the server to the client
at this point. It sends a Certificate message containing it’s TLS Certificate,
a Server Key Exchange message containing parameters that I will explain later,
and finishes off with a Server Hello Done message. The last message just
indicates the server has done all it needs to do now and will await further
instructions from the client.
Let’s take one of those detours I mentioned earlier to discuss what a TLS Certificate is.
TLS Certificates
Remember that padlock your browser shows you near the URL bar? If you click on it you should see an option to view the TLS Certificate for the website.
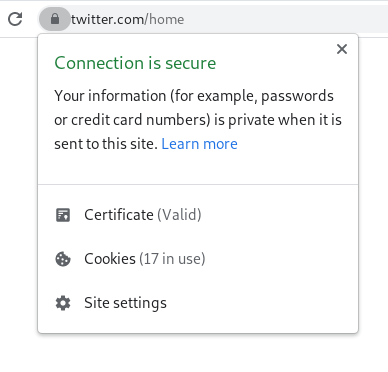
And clicking through to the certificate we see some basic information about this certificate.
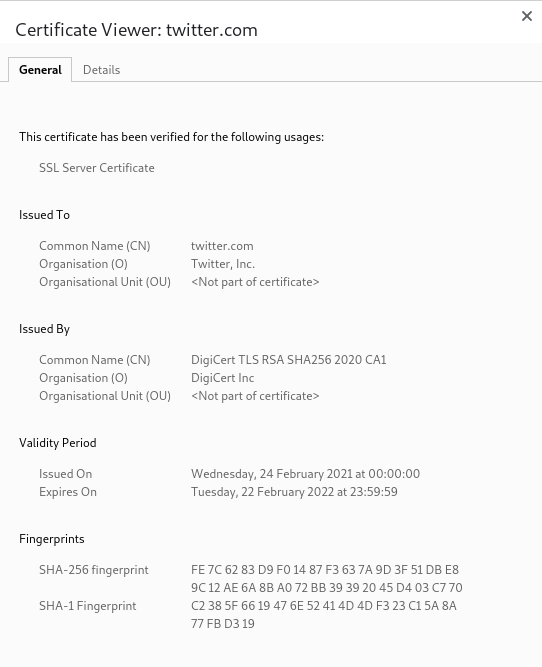
There is a lot more I could write about the contents of these certificates but
for now we are only really interested in the Issued by field in the first
screenshot, and the Certificate Signature Value and the Certificate
Signature Algorithm from the second screenshot.
Certificate Authorities
TLS Certificates are pretty much useless unless we have a way to confirm the authenticity of them and this is where the Public Key Infrastructure (PKI) comes into play. There are certain companies out there who are trusted Certificate Authorities (CA) which means they are trusted with issuing TLS Certificates and verifying the person/company requesting the certificate actually owns the website they are requesting the certificate for.
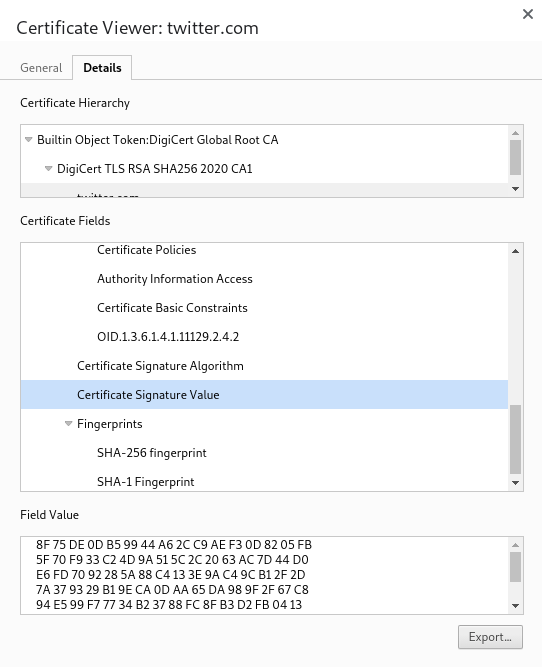
The Issued by field in Twitter’s certificate tells us that DigiCert are the
CA that issued it.
TLS Certificates are signed using the CA’s private key and their public key is shipped with operating systems and web browsers. This means when a website sends you their signed TLS Certificate you can verify it is indeed a certificate that was issued by the CA in the certificate by checking the digital signature using the public key.
This set up means we are able to confirm a certificate is genuine. This prevents someone from pretending to be your bank with a fake TLS Certificate and serving you a phishing site instead of the real website in order to steal your money.
Digital signatures are a fundamental concept in cryptography so it would be beneficial to briefly go over how they work so you can understand why we can trust these certificates.
asymmetric encryption
Digital signing is made possible through asymmetric encryption and the basic gist is you generate two mathematically linked keys using an algorithm like RSA, one is private and you keep it to yourself and the other is public that you share widely.
These keys are used with algorithms to encrypt data and because the keys are mathematically linked if a message is encrypted with one of these keys it can be decrypted using the other. Asymmetric encryption is very handy, it makes things like PGP possible.
Circling back to digital signatures now, here is how a TLS Certificate digital signature works starting with a request to generate a new certificate:
-
CA receives a request for a certificate for a website and they verify the person asking for it has the right to request it, i.e. they own the domain.
-
A certificate is generated and it is run through a hashing algorithm which results in a hash of the certificate’s contents, e.g.
55ca6286e3e4f4fba5d0448333fa99fc5a404a73 -
The resulting hash is then encrypted using the CA’s private key. The result is what we call a digital signature.
-
This signature is attached to the certificate so it can be used to verify the certificate is authentic.
Job done, the certificate is signed. We saw a digital signature earlier in Twitter’s
certificate under the name Certificate Signature Value. The certificate is
given to the domain owner to put on their servers so it can be served up to
clients.
Now let’s talk about how the digital signature works from the client’s perspective.
verifying a certificate
The CA has done its job so now when a server for this website receives an HTTPS request it will send this certificate back and the requesting browser can verify the certificate when it receives it, here is how that happens:
-
The browser can see in the certificate who the CA for this certificate is so it looks in some known places within the computers file system for the public key for this CA. Remember their public keys are shipped with operating systems and internet browsers.
-
Providing a public key was found the client decrypts the digital signature to reveal the hash of the certificate that was generated by the CA (thanks asymmetric encryption!).
-
All that is left to do now is run the certificate through the same hashing algorithm then compare the resulting hash with the hash that we got from the digital signature. The browser looks for the
Certificate Signature Algorithmfield so it can use the same algorithm that the CA used when creating the certificate.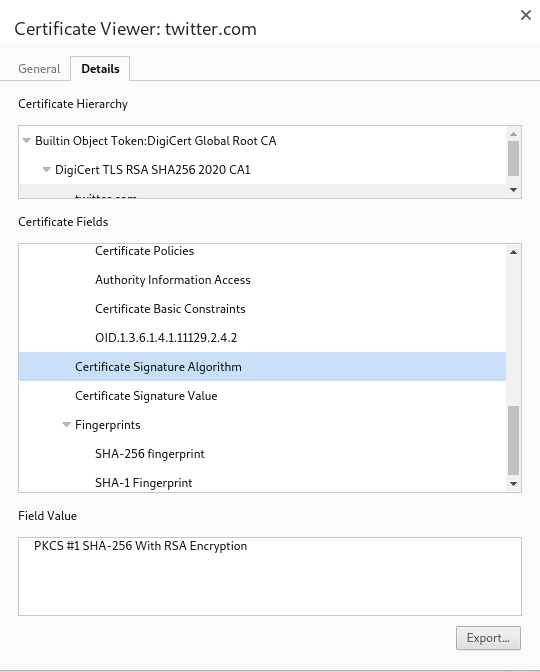
-
If the generated hash matches the hash we got from the digital signature then we know for sure this certificate is genuine and it hasn’t been tampered with.
It really is that simple.
server digital signature
There is one other important thing I haven’t mentioned that the server sends
during the Server Hello messages and this is another digital signature. The
server will take all the messages sent so far and hash them, then it encrypts
the result with its private key.
The TLS certificate will contain the server’s public key and the client, having verified the authenticity of the TLS certificate, can use the public key in the certificate to check this digital signature as well so we are sure the server that sent this TLS Certificate is the correct one and not someone pretending.
back to the handshake
Okay so our client has received a Server Hello message with the chosen cipher
suite and a Certificate message with the server’s TLS Certificate. Let’s
assume the certificate is valid and the client is happy to proceed. Here is
where we are in the process:
There is one message there that we haven’t discussed and that’s the Server Key
Exchange message, but before we get there we need to discuss symmetric
encryption.
symmetric encryption
It wouldn’t be silly to think that because asymmetric encryption is secure that we could just send the server our public key and just continue the conversation that way. Job done, right?
It’s true that we could however one of the draw backs here is asymmetric encryption, although secure, is relatively slow and it would actually require more work to manage keys as well as needing a way to verify public keys actually belong to the people/servers who are using them.
This is where symmetric key encryption comes into play. The difference between asymmetric and symmetric encryption is symmetric encryption uses just one key that both parties know about to encrypt as well as decrypt data.
Symmetric encryption is extremely fast and there’s no need to worry about key management. The issue here is how to do you agree on a value out in the open where anyone could be listening without sending the value or using something like asymmetric encryption?
creating a secret in public
Creating a symmetric key is the part of this whole process that I find incredibly elegant, in fact it’s what made me want to write this post initially.
There are a handful of ways to come up with a shared secret in TLS 1.2 but in
1.3 I think the only key exchange algorithm available now is the Diffie-Hellman
Key Exchange
and its Elliptic Curve variant. I’m going to focus on Diffie-Hellman because it
was in our cipher suite (DHE) and it’s the only one I can explain without my
brain melting.
A common analogy used to explain the Diffie-Hellman key exchange is mixing paints, sharing some paints publicly and having some paint colours that you keep secret you can exchange mixtures part way through and end up with the same colour at the very end. Someone watching the exchange happening in public will have a very hard time landing on the same colour at the end, so difficult in fact it’s pretty much pointless trying.

By Original schema: A.J. Han Vinck, University of Duisburg-Essen
This “common secret” at the end would be our master secret, AKA the key that will be used to encrypt/decrypt data.
Since the very first Client Hello message we have been working towards
creating a shared key, a “client random” number was sent by the client to the
server and the server sent a “server random” number to the client in the Server
Hello message. These are two values that anyone sniffing packets on the network
would have access to as well, they are also known as nonce values.
The party really gets going with the Server Key Exchange message, this
message contains parameters for use as part of Diffie-Hellman key exchange.
Let’s have a look at those values.
diffie-hellman parameters
In the Server Key Exchange three values are sent to the client, one is known
as the generator and another is a prime factor for that number which will be
used as a modulus. Modular
arithmetic is like division
but you are left with the remainder at the end, for example 6 mod 4 is equal
to 2 and 4 mod 2 equals 0. Another nice way to think about this is like a
clock, the values wrap back round to zero at some point.
The server has also chosen a random number that it keeps secret, this is the secret colour in the example above. Now I did say three values are sent to the client and the third value is based on a calculation using the generator, the prime modulus, and the server’s secret.
Let’s pretend the server chooses 3 as the generator and 17 as the modulus,
and for its secret it chooses 43. In practice these numbers will be much
larger but it’ll be easier to follow here if the numbers aren’t silly big.
Here is where the server mixes its paints so to speak:
# server
generator = 3
modulus = 17
secret = 43

# 3⁴³ mod 17 = 7
pre_secret = (generator ** secret) % modulus # => 7
The server sends the generator, the modulus, and its pre-secret over to the client. Although someone listening into this part of the exchange will get these numbers, it’s very difficult to work out what the server’s secret is, even the client has no idea what it would be.
With these values the client can generate it’s own pre-secret using a secret number that it chooses.
# client
generator = 3
modulus = 17
secret = 23

# 3²³ mod 17 = 11
pre_secret = (generator ** secret) % modulus # => 11
Now that the client has it’s own pre-secret it sends this to the server in a
Client Key Exchange message so the server can do the next step in calculating
the master secret which the client is also about to do.
To recap, here are all the values in play out in the open:
- client random
- server random
- generator number
- prime modulus number
- client pre-secret
- server pre-secret
Both the client and the server have all of these values, someone listening to the conversation could have all of these values too. This is where lovely maths comes into play to create the master secret. To start the client and the server do the following computation:
# server
server_secret = 43
client_presecret = 11
premaster_secret = (client_presecret ** server_secret) % modulus # => 12

# client
client_secret = 23
server_presecret = 7
premaster_secret = (server_presecret ** client_secret) % modulus # => 12
And with that they both end up with the same value: the premaster secret. They
both then combine this value with the client random and the server random
values to create the same master secret. Isn’t that neat? This whole process blew my
tits off when I first learned about it but then again you can easily impress me
with some basic maths.
why the fuck does that work?
Great question. If you have studied mathematics then you probably understand why this works but I’m going to lay it out plain and simple just in case.
Let’s forget about modular arithmetic for the moment and focus on exponentiation, there is a simple rule with exponents if you raise something to the power of a number then raise the result to another number, you can get the same result if you multiply the two exponents together then raise the original number to that instead.
(2²)³ = 64
(2³)² = 64
2⁶    = 64
You could rewrite the above without exponents and it is a little easier to see what’s going on.
(2 × 2) × (2 × 2) × (2 × 2) = 4 × 4 × 4 = 64

(2 × 2 × 2) × (2 × 2 × 2) = 8 × 8 = 64

2 × 2 × 2 × 2 × 2 × 2 = 64
The exponents in this case are the client and the server secret numbers. Adding the use of modular arithmetic into the mix helps to mask what these values are, after all someone listening to the TLS handshake already knows the generator number and the prime modulus. In practice the modulus is a much much larger number and the number that will be spat out when you mod the result of the exponentiation has no bearing on the original result.
To figure out what the exponent is the only real option here is to try and brute force it and attempt to guess the exponent AKA the secret value. This is what’s known as solving the discrete log problem.
what could they do then?
Someone listening has access to the generator, the modulus, as well as the two calculated pre-secrets. Could they somehow use these values to get to the right answer? I mean, based on the previous section we know they cannot but it’s good to understand why.
Say they take the pre-secrets and multiply them together and raise the generator to that power, would it work? Let’s find out using the same values from the previous example.
2²  = 4
2³  = 8
8*4 = 32
No bueno, certainly doesn’t equal 64. This is the same as taking the two
exponents and adding them, not multiplying them, before raising the original
number to the result.
2⁵ = 32
2 × 2 × 2 × 2 × 2 = 32
How you feeling? Still with me? Alright, no more maths I promise. Onwards!
change cipher spec
The maths has been done, values have been calculated, what happens next is the
client sends the server another message which is known as the Client Change
Cipher Spec message.
Essentially this message says the client has all of the information it needs to begin encryption so the next message you see from me will be encrypted using what we have agreed upon in the previous messages.
Let’s have another look at the cipher suite that we looked at at the beginning
of the post and hopefully it makes more sense: TLS_DHE_RSA_WITH_AES_128_GCM_SHA256
RSA was used to authenticate the server using public/private keys, DHE was
the key exchange algorithm used to generate a symmetric key known as the master
secret, and now everything after the WITH can be used to encrypt the rest of
the data moving forward which we haven’t touched on so I’ll briefly go over it
now.
That means that AES (Advanced Encryption
Standard) is going
to be used and the master secret will be the key that is used with the
algorithm, the key is 128 bits long. GCM means AES should be used in
Galois/counter
mode and I am not going to even try to attempt to explain that because I have no idea what it is.
And finally SHA256 is the hashing algorithm that will be used as the mechanism
to authenticate a message and ensure that nothing has changed in flight.
client finished
The client sends its final message of the handshake which is called Client
Finished.
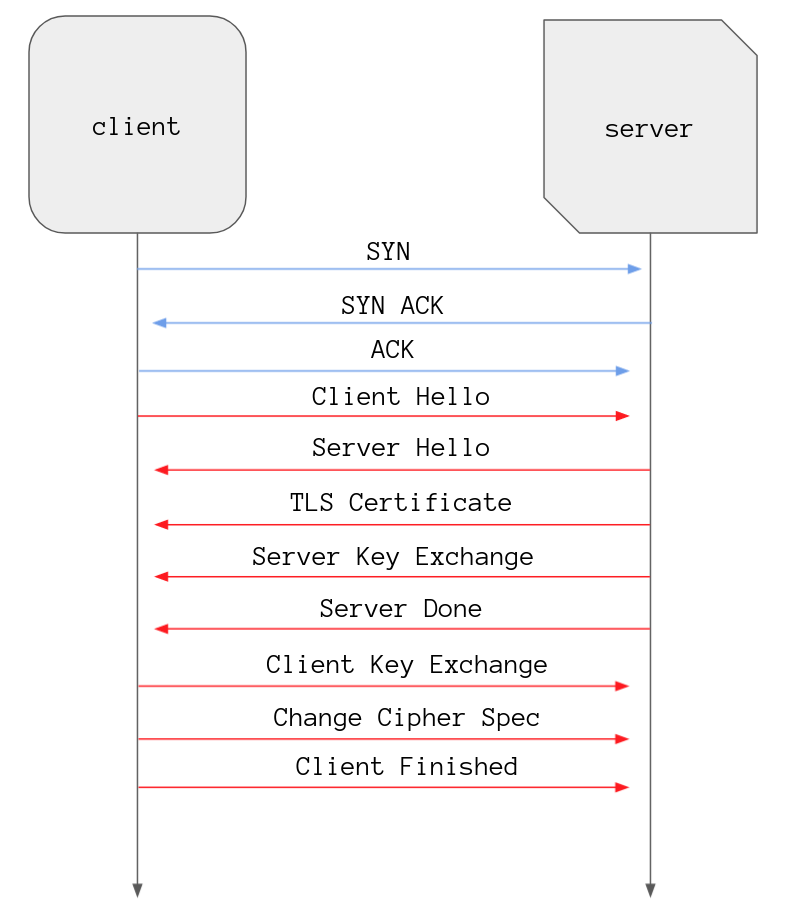
In this message the client has hashed all of the messages sent so far and encrypted it, and if everything has gone to plan the server should be able to decrypt this hash and check it against their hash of all the messages. If the server gets a different value then obviously something has gone awry so the handshake fails.
Not only that but this helps ensures that both the client and the server have seen the same sequence of events which rules out the possibility of someone interfering with the handshake. For example someone could have tricked the client into using TLS 1.1 instead of 1.2 to exploit some known vulnerability with that version.
wrapping it up
All that is left to do is for the server to send a Change Cipher Spec and a
Server Finished message.
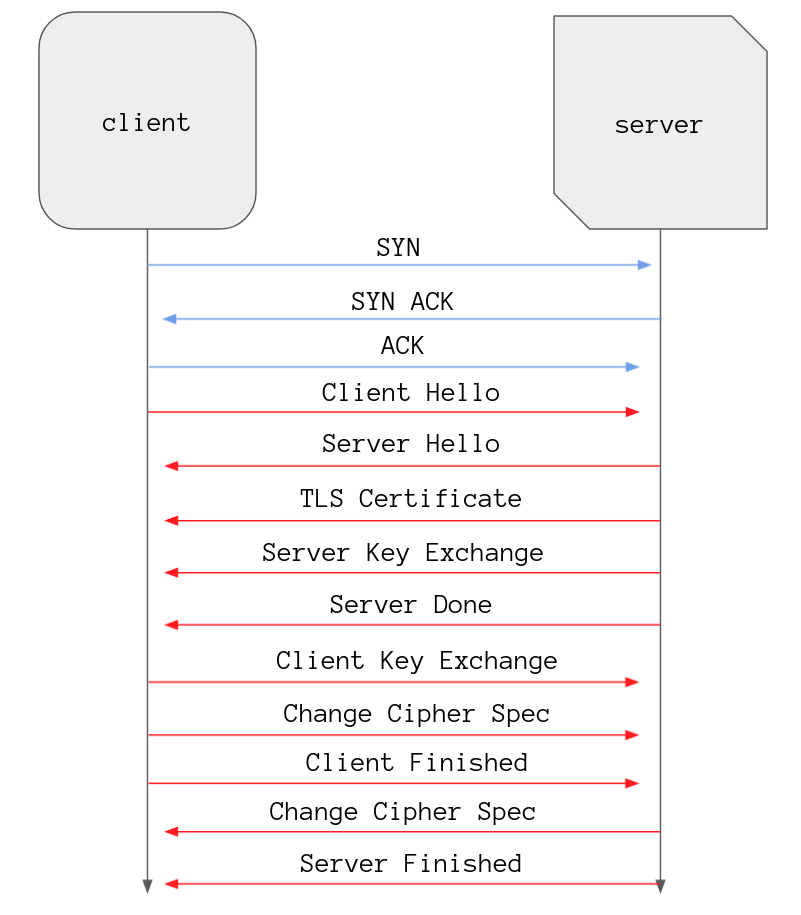
These messages are similar to the client ones only containing information based on the server’s perspective, and with that the handshake is complete! All messages from here on are symmetrically encrypted and no one can see what porn you are looking at.
TLS 1.3
Alright so we now understand the 1.2 handshake but I have mentioned 1.3 here and there and hinted at the fact that it is different. I’m sure going through 1.2 you might have thought to yourself “there is a lot of back and forth here” and you’d be spot on. If you dig into the 1.2 protocol you will also notice there is a lot of options when it comes to choosing algorithms.
Well, with 1.3 comes a more stream lined process, so stream lined that it only takes one round trip to get everything set up. To achieve this the protocol was simplified, removing a bunch of potentially insecure or confusing algorithm options so there are only a select few available.
select algorithms
Out of the 21 key exchange and authentication algorithms available in 1.2 only 6 remain in 1.3. The key exchange algorithms are either Diffie-Hellman Ephemeral which we covered earlier or a variation called Elliptic Curve Diffie-Hellman which is mathematically more complex so I won’t try explaining it.
The reason these algorithms are chosen is because they provide forward secrecy which means if a session key is compromised then future and past communications cannot be deciphered.
And when it comes to authentication there is RSA which we covered earlier, Pre-shared Key (PSK) which is exactly what it sounds like, then various versions of Digital Signature Algorithm (DSA) such as EdDSA and ECDSA.
the handshake
I won’t go into much detail with this because the general gist of what happens is the same it just happens in a different order, here is the handshake in its entirety.
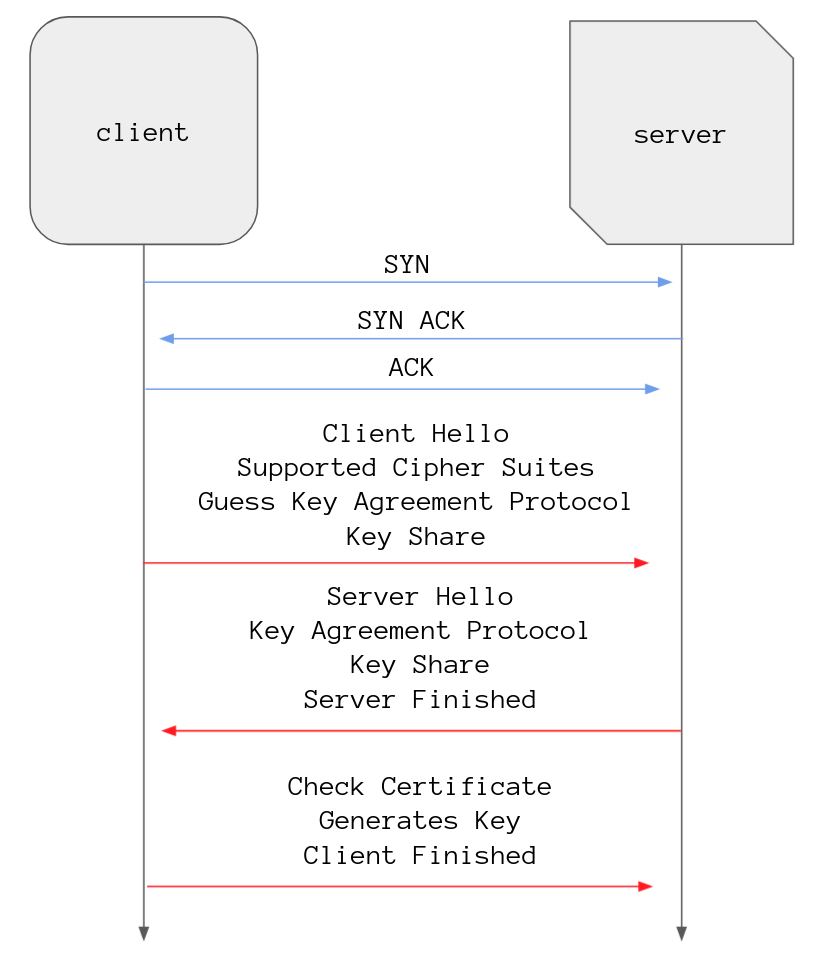
To start the client sends its hello message that contains its supported cipher suites, a guess at what key exchange algorithm the server will select, and its key share information for that particular key exchange algorithm.
The server responds with the key exchange algorithm it has chosen, its key share data for that algorithm, its TLS certificate, and finishes off with a server finished message.
The client checks the TLS certificate, generates the session key with the data from the key share message then sends its finished message. After this all data is encrypted.
fin
That’s it, a scenic tour through the TLS landscape, I just hope I got all the important bits right. The TLS protocol is incredibly important and something the internet needs in order to operate, giving us privacy and peace of mind. Now, it’s not essential to know this stuff to work as a software engineer but it certainly takes the magic out of the whole process.
Even just having a rough idea of how the protocol works can give you a leg up when it comes to debugging issues you can run into when developing web applications. You will certainly get brownie points if you are able to briefly explain the process during a job interview (I’ve been asked to in the past).
Right, enough waffling I’ve got stuff to do, laters!