How Containers Work
26 Jul 2020 | categories: blog
prev: How Git Works | next: Ruby: Enumerable & Enumerator
The internet is lousy with containers, those things are everywhere. If you haven’t worked with them directly I’m sure you’ve heard of them. Containers have made life a hell of a lot easier for many engineers and for good reason, they are pretty neat. But what are they? How do they work? Can they feel love?
This post isn’t about explaining exactly how Docker or a similar technology works, I guess that’s something for another day, what I want to focus on is the basic building blocks that allow you to “contain” a process, i.e. create a container. If you can contain a process and isolate it from the rest of the system then you’ve essentially got yourself a container.
This post is a bit of a long one but I’m hoping it will help show that
containers are actually fairly simple things and they open up a world of
possibilities. I’ll start by going over how containers differ from virtual
machines, I’ll follow that up with a short history of some system calls and
Linux kernel features that have been added over the years that paved the way for
container technology, after that I’ll talk about chroot and linux namespaces
in more detail.
what is a container? is it a virtual machine?
Right off the bat I fancy being pedantic: a container isn’t actually thing, it’s just a name for a combination of features that allow us to “contain” a process and the child processes that it spawns. A container is quite a different thing from a virtual machine, so to explain the difference let’s walk through what a virtual machine is.
virtual machines
Here is a simple diagram which represents how a server might run three virtual machines with each virtual machine running a different application. Just one note, the diagrams are not accurate representations of how much memory each block takes up on a machine, using blocks just aids in getting my point across.
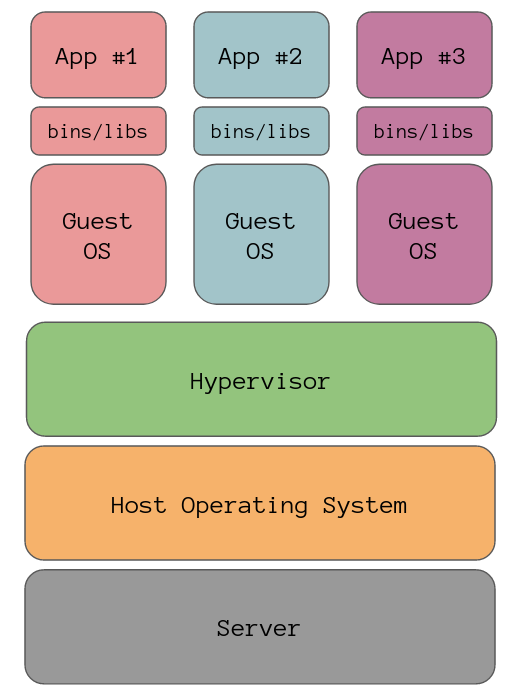
At the bottom of our stack is the infrastructure, in our case it’s the server we are running the virtual machines on, the layer above that is the server’s operating system. The box above that is something called a hypervisor, because a virtual machine is essentially just a self-contained computer packed into a file there needs to be something that can run that file and interact with the operating system or underlying infrastructure, and that is where the hypervisor comes in.
The three stacks above the hypervisor are the virtual machines, as you can see each virtual machine needs its own operating system which takes up a huge chunk of memory. If the apps are all run on Debian for example, then you would have three copies of Debian on the server because a virtual machine needs its own operating system as it cannot use the operating system of another.
Then on top of each guest OS we have the usr and bin directories for the applications
and finally the applications themselves. In this simple diagram we can fit three
virtual machines on the server, clearly this isn’t very space efficient. Not
only that but the boot time for virtual machines is quite long too given the
fact you need to wait for the operating systems to start.
containers
Here is the same server that is running applications as containers rather than virtual machines.
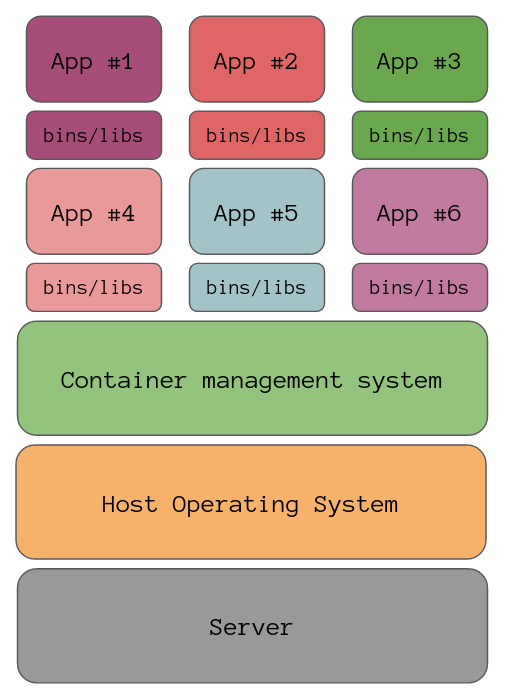
Just as before we’ve got the host operating system but running on top of that is some sort of container management system, in the case of Docker this would be a Docker daemon which is responsible for managing the containers on the server.
You will notice that there are no guest operating systems in this diagram, containers contain the files from its base image, which is usually a Linux distribution. This means any system calls that the container needs to make can be handled by the host’s Linux kernel.
This lack of a guest operating system means we can fit more containers onto the server, the container has all of the files that it needs to run and nothing more. Another lovely consequence of the lack of a guest OS is the lightning fast start up times, after all we are basically just starting a new process as far as the host operating system is concerned. Once the container is up then it’s just a matter on waiting for your application to start up.
tarballs
Seeing as we don’t need a hypervisor to run a container unlike a virtual machine, and a container holds all the files it needs to run, what exactly is it? In essence it’s just a tar file. That’s it.
I’ve got a small directory here with some files and a subdirectory in it, but
let’s pretend it’s something like a Ruby on Rails application with /usr and
/bin directories, anything it would need to run on a normal operating system.
/tmp » tree ./example
./example
├── dir1
│   └── file2
├── file1
└── file3

1 directory, 3 files
If I use tar I can create a compressed representation of that directory, also known
as a tarball.
/tmp » tar zvcf example.tar ./example
./example/
./example/file3
./example/dir1/
./example/dir1/file2
./example/file1
/tmp » ls -l example.tar
-rw-r----- 1 skip skip 195 Jul 25 12:03 example.tar
Seeing as a tarball is just a file, I can upload it to the internet, send it to
a friend, or put it on a server. This is basically all a container is and
creating this tarbar is what the command docker build does. Also, because a
container has its own file system it can run completely different operating
system distributions, the host might be running Debian whilst some containers
are running Alpine Linux whilst
other containers are running CentOS,
because they can all use the same kernel there are no problems.
Seeing as the container holds all of its dependencies there are no longer headaches around mismatched dependency versions, the application you run while developing is exactly the same one that will be run on production.
Containers sound pretty sweet, where did they come from?
a brief history of containers
A computer is essentially just a hierarchy of processes, and before containers came about each process had the same root directory, they were in the same namespaces because namespaces didn’t exist yet, they all had access to all of the same resources as other processes. Like one big family all hanging in out the house together, it was loud and noisy.
Let me take you on a quick whistle stop tour through the history of technologies that led to containers as we know them today.
Back in 1979 the chroot system call was
added to Unix V7 and this was the first system call that would start us on our
journey towards the containers we know and love. chroot was then added
to BSD in 1982.
I’ll go into more detail about what chroot allows us to do later.
Jump forward a few decades to the year 2000 and
FreeBSD introduced FreeBSD
Jails which was basically a souped
up version of chroot. It was created by a hosting provider to allow them to
partition a server into smaller “jails”, run a guest operating system on top of
the FreeBSD host, and give each jail its own hostname and IP address so you
could access it from the network. With jails there was no resource control so
each jail could use as much memory or CPU as it wanted.
A couple of years later and
Namespaces were added to the
Linux kernel in 2002. Only the mnt namespace was added, additional namespaces
wouldn’t start appearing for another 4 years.
Three years later, in 2005, and Sun Microsystems released Solaris Zones. Zones was an improvement on FreeBSD Jails, it allowed the user to set limits on each zone for things like CPU and memory, as well as letting you throttle I/O.
In 2007 control groups (cgroups) were added to the Linux kernel which allowed users to control the resources that all of the processes in a cgroup have access to. For example you can limit the amount of memory a group can use, you can change the prioritization for some groups so they have a larger or smaller share of CPU and disk I/O throughput.
In 2008 Linux Containers (LXC) was released, it was a full container management system which utilised namespacing and cgroups.
Then in 2013 Docker was unleashed onto the world and container popularity exploded. Docker originally used LXC in the early years but slowly transitioned to its own container management library. The reason Docker had such a big impact is because it was an entire ecosystem, which included a place you could store your container images: dockerhub.com.
creating our own containers
We now have a basic understanding of what a container is: a set of processes that have their own root directory and namespaces which isolates it from the host system. That being said it all sounds a little complicated but in fact we could build our own “container” on the command line quite easily. It wouldn’t be exactly like a Docker container but it will peel back the shiny facade just a bit so we can peak inside to see how the sausage is made.
chroot
chroot, as I mentioned previously, allows you to change the root directory for
a process. chroot is a system call but we can play around with it on the
command line too.
chroot takes the directory you would like to use as the new root directory and
then a command you want to run in it. Let’s get set up with an example
directory by copying over a few files, we need to do this because once the
process’s root directory is changed it won’t have access to anything outside of
its directory, so that means no /bin and that definitely means no bash.
~/example » cp -a /lib/ lib/
~/example » cp -a /lib64/ lib64/
~/example » cp -a /usr/ usr/
~/example » mkdir bin && cp /bin/bash bin/
~/example » ls
bin lib  lib64  usr
In my example directory I have all the directories and files that bash is
going to need to start. Let’s run chroot and give it the present working
directory and a path relative to this new root directory for the command I want
to run.
~/example » sudo chroot $PWD /bin/bash
bash-5.0# pwd
/
bash-5.0# ls
bin  lib  lib64  usr
Awesome, the bash shell started up and gave us a new prompt and it is confined
to its own directory, it thinks ~/example is the root of the file system. This
is the first step towards creating a container. Interestingly if I opened up
a new shell in another window I can still access the files in that directory.
~/example » touch hi
~/example » ls
bin  hi lib  lib64  usr
And in the first shell, the one with bash running, we can see that file.
bash-5.0# ls
bin  hi  lib  lib64  usr
bash-5.0#
Right, so changing a process’s root directory isn’t enough. Other processes can
mess around with the directory too which isn’t great, not only that but we can
actually see the bash shell and its parent process from the other shell that I
started.
~/example » ps -eo pid,user,cmd | grep bash
16624 root     sudo chroot /home/skip/example /bin/bash
16625 root     /bin/bash
All these problems can be fixed with namespaces…
namespaces
Namespaces are a Linux kernel feature that allow you to partition certain kernel resources so that one group of processes can see one set of resources whilst other groups can see theirs.
There are a variety of namespaces:
- Mount
- Process ID (PID)
- Network
- Interprocess communication (IPC)
- Unix Timesharing (UTC)
- User ID (UID)
- cgroup
- Time
Usually when you start your computer there is only really a need for one set of
namespaces and all of your processes are in the same namespaces. On Linux we can
see the namespaces a process is in by running ls -l /proc/$$/ns, $$ is
replaced by the shell with the current process ID.
~/example » ls -l /proc/$$/ns
total 0
lrwxrwxrwx 1 skip skip 0 Jul 25 13:17 cgroup -> 'cgroup:[4026531835]'
lrwxrwxrwx 1 skip skip 0 Jul 25 13:17 ipc -> 'ipc:[4026531839]'
lrwxrwxrwx 1 skip skip 0 Jul 25 13:17 mnt -> 'mnt:[4026531840]'
lrwxrwxrwx 1 skip skip 0 Jul 25 13:17 net -> 'net:[4026532008]'
lrwxrwxrwx 1 skip skip 0 Jul 25 13:17 pid -> 'pid:[4026531836]'
lrwxrwxrwx 1 skip skip 0 Jul 25 13:17 pid_for_children -> 'pid:[4026531836]'
lrwxrwxrwx 1 skip skip 0 Jul 25 13:17 user -> 'user:[4026531837]'
lrwxrwxrwx 1 skip skip 0 Jul 25 13:17 uts -> 'uts:[4026531838]'
I will go over what each of these namespaces is for and how we can mess around
with some of the most important ones on the command line. The Time namespace
is a new one that was introduced a few months ago, so I won’t touch that one
because as you can see from the output above, the version of the kernel I’m
working with doesn’t have it.
system calls
There are three system calls
available to use which would let us mess with namespaces, they are clone,
unshare, and setns.
clone is a general purpose function that lets you to create a new child
process based on the current process, you can add options to specify which
namespaces the process should exist within.
unshare lets you dissociate part of a process’s context that is currently
being shared with other processes, for our interests today that would be
namespaces. The difference between clone and unshare is clone creates a
new process whereas unshare doesn’t.
And finally setns lets you change the namespaces of the current process
specified by file descriptors which is related to the namespace you want to
enter.
Learning about system calls is great however I don’t know enough C to
demonstrate them, not to mention the code might be a little hard to follow if
you don’t know C. Luckily there is an unshare command available to us on the
command line which is good enough to demonstrate changing namespaces for a
process.
Moving forward I’ll refer to the original shell that I’m working on as the “host” and the process I am tinkering with as the “contained process”. It should make discussing things a little easier to follow.
PID namespace
The PID namespace isolates process IDs, this allows a process to have a separate set of PIDs. In essence we can have two processes on the same host using the “same” PID. It is this namespace that allows a container to think there are only a few processes running, because in its eyes that’s all it it can see. The view is different from the parent process, i.e. the host process that spawned the new “unshared” process with its new namespaces. More on that in a little bit.
Let’s use unshare(1) to create a new PID namespace by passing in the --pid
option. I’m going to use the same ~/example directory from before with all of
the files I copied previously.
~/example » sudo unshare --pid --fork --mount-proc ./bin/bash
root@wizard#
That didn’t throw any errors which is always good, before I continue I should
explain one or two things about the other options I used. --fork here tells
unshare to create a new process when running ./bin/bash rather than running
it directly.
To explain --mount-proc I need to tell you about the /proc
file system, it is a special file system in
Unix-like systems which displays information about running processes on the
machine, it’s a way for the kernel-space to communicate with the user-space. The
ps command will use this file system to obtain data about running processes
without needing to bother the kernel with system calls.
Seeing as we are creating a new PID namespace we need to mount a new proc
file system that will hold information about processes in the new namespace,
hence the --mount-proc option. We can run ps to see how many processes are
running in this new namespace, which should be two.
root@wizard# ps aux
USER       PID %CPU %MEM    VSZ   RSS TTY      STAT START   TIME COMMAND
root         1  0.0  0.0   6992  3744 pts/4    S    12:13   0:00 bash
root         5  0.0  0.0  10632  3144 pts/4    R+   12:59   0:00 ps aux
The process with PID 1 is quite important in computers, it is always held by the
init process. The init process is the
first process that starts on your computer when it is booting, any process
thereafter is a child of this process. If the process with PID 1 were to crash
or get killed for whatever reason then all its children will be terminated.
If I run ps on the host I can find the init process of my machine.
~/example » ps -eo pid,user,cmd | grep 'init'
    1 root     /sbin/init
Now, if I grep the processes in the host I can find the contained process that
we unshared too, only the contained process has a different PID on the host.
This is what I was referring to earlier when I mentioned that the parent can
still see the process IDs of its children.
~/example » ps -eo pid,user,cmd | grep 'bash'
31119 root     sudo unshare --fork --pid --mount-proc ./bin/bash
31120 root     unshare --fork --pid --mount-proc ./bin/bash
31121 root     ./bin/bash
Here we see the original sudo command has PID 131119, then next we see the
unshare command that sudo ran for us, then finally at the end we see our
bash process. This is an important thing to understand about PID namespaces, a
parent process can see its child processes, but sibling processes won’t know
about each other if they are in separate namespaces, and children cannot see
its parents namespace. In other words the host can see everything but the
children are blind.
And to show that the new contained bash process is in its own namespace we can look at
what information is in /proc.
root@wizard# ls -l /proc/$$/ns
total 0
lrwxrwxrwx 1 root root 0 Jul 26 09:18 cgroup -> 'cgroup:[4026531835]'
lrwxrwxrwx 1 root root 0 Jul 26 09:18 ipc -> 'ipc:[4026531839]'
lrwxrwxrwx 1 root root 0 Jul 26 09:18 mnt -> 'mnt:[4026532567]'
lrwxrwxrwx 1 root root 0 Jul 26 09:18 net -> 'net:[4026532008]'
lrwxrwxrwx 1 root root 0 Jul 26 09:18 pid -> 'pid:[4026532569]'
lrwxrwxrwx 1 root root 0 Jul 26 09:18 pid_for_children -> 'pid:[4026532569]'
lrwxrwxrwx 1 root root 0 Jul 26 09:18 user -> 'user:[4026531837]'
lrwxrwxrwx 1 root root 0 Jul 26 09:18 uts -> 'uts:[4026531838]'
All of the namespaces are the same apart from pid and pid_for_children, the
latter just means any child processes spawned by this process will be put into
the same namespace. To save you scrolling back up here are the namespaces from
the host.
~/example » ls -l /proc/$$/ns
total 0
lrwxrwxrwx 1 skip skip 0 Jul 25 13:17 cgroup -> 'cgroup:[4026531835]'
lrwxrwxrwx 1 skip skip 0 Jul 25 13:17 ipc -> 'ipc:[4026531839]'
lrwxrwxrwx 1 skip skip 0 Jul 25 13:17 mnt -> 'mnt:[4026531840]'
lrwxrwxrwx 1 skip skip 0 Jul 25 13:17 net -> 'net:[4026532008]'
lrwxrwxrwx 1 skip skip 0 Jul 25 13:17 pid -> 'pid:[4026531836]'
lrwxrwxrwx 1 skip skip 0 Jul 25 13:17 pid_for_children -> 'pid:[4026531836]'
lrwxrwxrwx 1 skip skip 0 Jul 25 13:17 user -> 'user:[4026531837]'
lrwxrwxrwx 1 skip skip 0 Jul 25 13:17 uts -> 'uts:[4026531838]'
I think I’ve gotten the point across about what a PID namespace is for so let’s move onto the mount namespace.
mount namespace
The mount namespace allows you to give a set of processes a completely different set of mount points, which is basically a completely different view of the file system. Unless any of those mount points are shared mounts, which are mounts shared between namespaces, then changes made to a directory in one namespace won’t show up in another.
Let’s kill our contained process and start it again, this time also giving it a new
mount namespace. As we progress through the namespaces I’ll substitute the long
form options for namespaces we’ve covered for the short form versions, so I’ll
use -fp instead of --fork --pid.
~/example » sudo unshare -fp --mount --mount-proc ./bin/bash
root@wizard#
Let’s check the namespaces.
root@wizard# ls -l /proc/$$/ns
total 0
lrwxrwxrwx 1 root root 0 Jul 26 09:31 cgroup -> 'cgroup:[4026531835]'
lrwxrwxrwx 1 root root 0 Jul 26 09:31 ipc -> 'ipc:[4026531839]'
lrwxrwxrwx 1 root root 0 Jul 26 09:31 mnt -> 'mnt:[4026532567]'
lrwxrwxrwx 1 root root 0 Jul 26 09:31 net -> 'net:[4026532008]'
lrwxrwxrwx 1 root root 0 Jul 26 09:31 pid -> 'pid:[4026532568]'
lrwxrwxrwx 1 root root 0 Jul 26 09:31 pid_for_children -> 'pid:[4026532568]'
lrwxrwxrwx 1 root root 0 Jul 26 09:31 user -> 'user:[4026531837]'
lrwxrwxrwx 1 root root 0 Jul 26 09:31 uts -> 'uts:[4026531838]'
As expected the mnt and pid namespaces are different, however the file
system that our contained process can currently see is the same as other mount
namespaces. This is intentional and we need to do a little work to mount our
own file systems to play around with. Let’s create our own new temporary file system withing the
contained process’s mount namespace that we can put things inside.
root@wizard# mkdir secret
root@wizard# mount -n -t tmpfs tmpfs ./secret
root@wizard# ls
bin  lib  lib64  secret  usr
root@wizard# touch hi
root@wizard# ls secret
hi
Here I have created a directory called secret and then used mount to mount a
temporary file system on this directory, passing -n so it doesn’t write any
information about it in /etc/mtab, which is the file used to store information
about currently mounted file systems.
I’ve then added a file called hi to this secret file system, and because we
are in a separate mount namespace this file cannot be seen by other processes in
other mount namespaces, not even the host.
~/example » ls
bin  lib  lib64  secret  usr
~/example » sudo ls secret
~/example »
Not only can we not see anything in the secret directory (even using sudo)
but any file put in here by the host won’t be seen by the contained process.
~/example » sudo touch secret/hello
~/example » sudo ls secret
hello
~/example »
And this is what the contained process can see in the secret directory in its
separate mount namespace.
root@wizard# ls secret
hi
root@wizard#
This solves our problem from earlier where processes could mess with our directories, now our directories are sealed off from others. You can see isolation starting to take shape. Let’s move on.
UTS namespace
UTS stands for Unix Timeshare and it is a term that comes from the early days of Unix when people had to share computers. The UTS namespace isolates the hostname and the Network Information Service (NIS) of a process, I won’t go into NIS so let’s focus on the hostname for now. The hostname is basically the name of your computer on the network.
On the host my hostname is set to wizard.
~/example » hostname
wizard
And in the contained process the hostname is also wizard, you’ve probably
noticed based on the prompt in previous output.
root@wizard# hostname
wizard
If I were to change the hostname in the contained process now it would change it
on the host as well, which is not ideal. So let’s create a new UTS namespace by
using the --uts option with unshare.
~/example » sudo unshare -fpm --uts --mount-proc ./bin/bash
root@wizard# hostname
wizard
root@wizard# hostname kevin
root@wizard# hostname
kevin
And if we check the hostname on the host, it should still be wizard.
~/example » hostname
wizard
You might be wondering why this useful, well have you ever noticed when you jump into a Docker container the hostname is set for you? Usually something sensible to tell you which container you are in, you can thank the UTS namespace for that. Having a distinct hostname also helps with networking.
There isn’t much else to explain with this one, so let’s tackle networking.
Network namespace
The network namespace allows processes in the namespace to have completely separate network interfaces, routing tables, you know that sort of thing. Essentially you can shut off a group of processes from everything else on the network, you then need to go through the steps to create interfaces on the host that these contained processes can use to communicate with the host, other containers, and the outside world.
Networking is not one of my strong suits but bear with me and I’m sure we can make it through this section without crying too much. Don’t worry if networking isn’t your thing either, we can make it through this together.
Let’s kick off the madness by unsharing again but this time adding the --net
option.
~/example » sudo unshare -fpmu --net --mount-proc ./bin/bash
root@wizard# ls -l /proc/$$/ns
total 0
lrwxrwxrwx 1 root root 0 Jul 26 10:21 cgroup -> 'cgroup:[4026531835]'
lrwxrwxrwx 1 root root 0 Jul 26 10:21 ipc -> 'ipc:[4026531839]'
lrwxrwxrwx 1 root root 0 Jul 26 10:21 mnt -> 'mnt:[4026532567]'
lrwxrwxrwx 1 root root 0 Jul 26 10:21 net -> 'net:[4026532571]'
lrwxrwxrwx 1 root root 0 Jul 26 10:21 pid -> 'pid:[4026532569]'
lrwxrwxrwx 1 root root 0 Jul 26 10:21 pid_for_children -> 'pid:[4026532569]'
lrwxrwxrwx 1 root root 0 Jul 26 10:21 user -> 'user:[4026531837]'
lrwxrwxrwx 1 root root 0 Jul 26 10:21 uts -> 'uts:[4026532568]'
As expected the pid, mnt, uts, and net namespaces are different from the
host. If we use the ip command we can have a look at the network links
that we’ve got access to in the contained process.
root@wizard# ip link
1: lo: <LOOPBACK> mtu 65536 qdisc noop state DOWN mode DEFAULT group default qlen 1000
    link/loopback 00:00:00:00:00:00 brd 00:00:00:00:00:00
We only have the loopback device, we have no way to contact the outside world. To do that we need the host to set up a link for us. Here is a diagram to (hopefully) help people visualise what’s going on here, it’s a little sparse right now. You can see the host and the “container”, which is just our contained process.
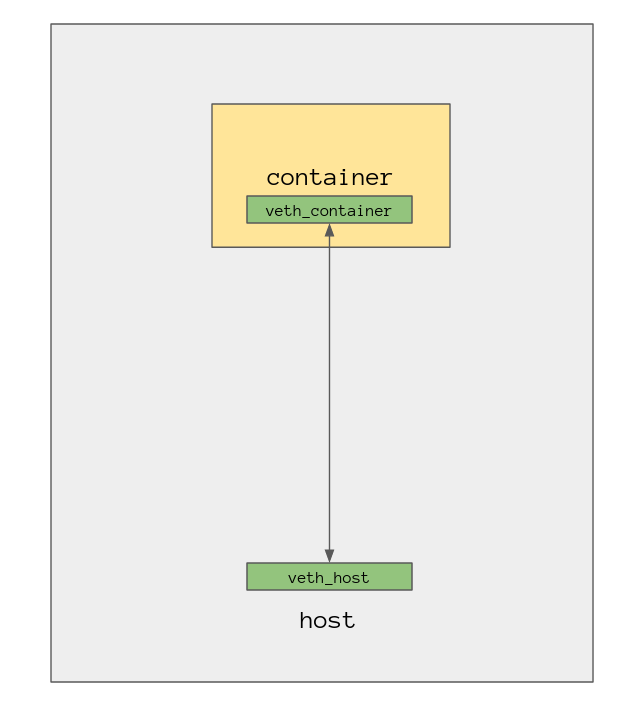
First things first we need to create something called a Virtual Ethernet
Interface, which comes as a pair. Think of this as a cable or a tube, we will
use this veth pair to connect the contained process to the host. All this work
needs to be done in the host.
~/example » sudo ip link add veth_host type veth peer name veth_container
~/example » ip link
...
7: veth_container@veth_host: <BROADCAST,MULTICAST,M-DOWN> mtu 1500 qdisc noop state DOWN mode DEFAULT group default qlen 1000
    link/ether aa:88:c7:9f:b0:f5 brd ff:ff:ff:ff:ff:ff
8: veth_host@veth_container: <BROADCAST,MULTICAST,M-DOWN> mtu 1500 qdisc noop state DOWN mode DEFAULT group default qlen 1000
    link/ether 2e:bc:8f:2d:1a:bf brd ff:ff:ff:ff:ff:ff
Using ip I ask it to create a new link for me called veth_host which is of
type veth, and while you’re at it also create me another one which will be the
peer of veth_host and call it veth_container.
I’ve removed all the other clutter from the output of the ip command to only show
the newly created veth pair, but having both veths sitting on the host isn’t
much use, we need to move one of them into our contained process’s networking
namespace.
~/example » ps -eo pid,user,cmd | grep 'bash'
 1251 root     sudo unshare -fpmu --net --mount-proc ./bin/bash
 1252 root     unshare -fpmu --net --mount-proc ./bin/bash
 1253 root     ./bin/bash
~/example » sudo ip link set veth_container netns 1253
First we need the PID of the contained process which can be found using ps
like before. Then using ip we can set the network namespace of the
veth_container to the namespace of the process with the PID 1253, which is
our contained process.
Checking the output of ip link again on the host and veth_container has
disappeared leaving us with only veth_host.
~/example » ip link
...
8: veth_host@if7: <BROADCAST,MULTICAST> mtu 1500 qdisc noop state DOWN mode DEFAULT group default qlen 1000
    link/ether 2e:bc:8f:2d:1a:bf brd ff:ff:ff:ff:ff:ff link-netnsid 0
If we jump back over to the contained process and check its network
interfaces again we should see veth_container in there.
root@wizard# ip link
1: lo: <LOOPBACK> mtu 65536 qdisc noop state DOWN mode DEFAULT group default qlen 1000
    link/loopback 00:00:00:00:00:00 brd 00:00:00:00:00:00
7: veth_container@if8: <BROADCAST,MULTICAST> mtu 1500 qdisc noop state DOWN mode DEFAULT group default qlen 1000
    link/ether aa:88:c7:9f:b0:f5 brd ff:ff:ff:ff:ff:ff link-netnsid 0
Updating the diagram from earlier it now looks something like this.
Now that we have one end of the veth interfaces in both of our namespaces,
it’s time to configure them by giving them IP addresses. Let’s configure the
contained process first.
root@wizard# ip addr add 10.0.0.2/24 dev veth_container
root@wizard# ip link set veth_container up
root@wizard# ip addr show veth_container
7: veth_container@if8: <NO-CARRIER,BROADCAST,MULTICAST,UP> mtu 1500 qdisc noqueue state LOWERLAYERDOWN group default qlen 1000
    link/ether aa:88:c7:9f:b0:f5 brd ff:ff:ff:ff:ff:ff link-netnsid 0
    inet 10.0.0.2/24 scope global veth_container
       valid_lft forever preferred_lft forever
Using ip we add a new IP address using addr add then pass it an IP address
and specify which device we want to affect. Then using link set we can turn
the device on, so to speak.
Let’s do the same thing inside the host, making sure to give it a different IP address.
~/example » sudo ip addr add 10.0.0.1/24 dev veth_host
~/example » sudo ip link set veth_host up
~/example » ip link show veth_host
8: veth_host@if7: <BROADCAST,MULTICAST,UP,LOWER_UP> mtu 1500 qdisc noqueue state UP mode DEFAULT group default qlen 1000
    link/ether 2e:bc:8f:2d:1a:bf brd ff:ff:ff:ff:ff:ff link-netnsid 0
Now if all has went to plan we should be able to ping the contained process from the host. Hold onto your butts.
~/example » ping 10.0.0.2
PING 10.0.0.2 (10.0.0.2) 56(84) bytes of data.
64 bytes from 10.0.0.2: icmp_seq=1 ttl=64 time=0.110 ms
64 bytes from 10.0.0.2: icmp_seq=2 ttl=64 time=0.041 ms
64 bytes from 10.0.0.2: icmp_seq=3 ttl=64 time=0.040 ms
64 bytes from 10.0.0.2: icmp_seq=4 ttl=64 time=0.045 ms
64 bytes from 10.0.0.2: icmp_seq=5 ttl=64 time=0.041 ms
^C
--- 10.0.0.2 ping statistics ---
5 packets transmitted, 5 received, 0% packet loss, time 101ms
rtt min/avg/max/mdev = 0.040/0.055/0.110/0.028 ms
Awesome! Now let’s see if the contained process can reach the host.
root@wizard# ping 10.0.0.1
PING 10.0.0.1 (10.0.0.1) 56(84) bytes of data.
64 bytes from 10.0.0.1: icmp_seq=1 ttl=64 time=0.063 ms
64 bytes from 10.0.0.1: icmp_seq=2 ttl=64 time=0.022 ms
64 bytes from 10.0.0.1: icmp_seq=3 ttl=64 time=0.043 ms
64 bytes from 10.0.0.1: icmp_seq=4 ttl=64 time=0.042 ms
64 bytes from 10.0.0.1: icmp_seq=5 ttl=64 time=0.048 ms
^C
--- 10.0.0.1 ping statistics ---
5 packets transmitted, 5 received, 0% packet loss, time 86ms
rtt min/avg/max/mdev = 0.022/0.043/0.063/0.015 ms
Great, we have packets flowing through the veth pair! This isn’t the end of
the story, if we want the contained process to be able to reach the internet we
would need to create a network bridge to connect it with a physical network
interface on the host. Right now all it can see is one end of the veth pair,
and the other end isn’t connected to anything on the host.
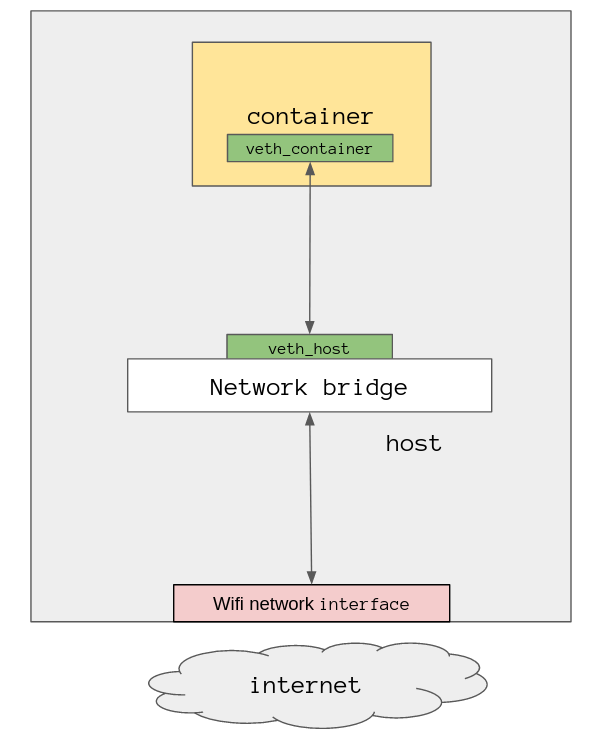
If you see the term “Docker bridge” kicking around when you’re working with Docker that is all this is, a network bridge, it enables your containers to speak with the internet.
I won’t walk through creating a bridge and connecting things up because I’m already out of my depth, but here is how it might look. Note that the bridge can also be used to connect other containers together, so they can communicate not only with the internet but also with each other.
Let’s depart from networking before I cause anymore damage and I’ll go over the remaining namespaces, there isn’t much for me to demonstrate with them so I’ll give you a rundown of what they are.
IPC namespace
Inter Process Communication (IPC) namespace is used for isolating System V IPC objects and POSIX message queues, in short it’s a way for processes to communicate with each other. Processes can only communicate with other processes in the same IPC namespace.
UID namespace
The User ID namespace is a way for processes to have a separate list of user
IDs, effectively allowing them to all use the same IDs. This is important
because it allows a container to give their root user ID 0 or which ever ID
the root user usually has on the distribution being used as the base for the
container. In reality the root user in the container actually has a completely
different user ID in the eyes of the host, like 1500 for example.
In all the examples so far the root user has actually been the root user of the
host system, this is obviously not ideal because someone who knows what they are
doing could potentially get out of the namespace and do some nasty things to the
host.
With a separate UID namespace the container thinks their root user has
administrative rights because it has the UID 0 and let’s it perform superuser
actions whilst being essentially powerless on the host.
cgroup namespace
And finally we have the cgroup namespace, as I mentioned before this namespace
allows you to limit resources for processes within the namespace.
We can use cgcreate to create our own cgroup and set some limits on it for
things like CPU and memory.
~/example » cgroup_id=12345
~/example » sudo cgcreate -g "cpu,cpuacct,memory:$cgroup_id"
~/example » sudo cgset -r cpu.shares=512 "$cgroup_id"
~/example » sudo cgset -r memory.limit_in_bytes=100000000 "$cgroup_id"
Now we have a cgroup with the id 12345 which we can use in the next section.
Namespaces and chroot
Using what we know about namespaces and chroot we can create our own basic
version of a container with its own namespaces. Let’s give it a go.
~/example » sudo cgexec -g "cpu,cpuacct,memory:$cgroup_id" \
  unshare --fpnumi --mount-proc chroot $PWD /bin/bash -c \
  "hostname kevin && export PS1='\h: ' && bash"
kevin: pwd
/
kevin: ls
bin  lib  lib64 secret  usr
With one line on the command line we are able to start a new process running
bash which has all of its own namespaces, which includes a cgroup limiting how
much of the hosts resources it is allowed to use. It really is that simple.
differences with an actual container
What Docker and other container management systems do is hide all of what I’ve
been speaking about behind a simple to use interface so you don’t have to worry
about things like manually creating cgroups and fiddling with network veth
pairs.
Creating a fully fledged container requires a little more work than just running
the commands I’ve been using and makes use of things like overlay file systems,
and seccomp-bpf to lock down what system calls the container has access to.
And instead of using chroot a command called pivot_root is used because with
chroot a process with root access could still potentially access the
underlying file system. With pivot_root you can move the process to a new root
directory then unmount the old file system completely cutting the container off
from the host.
A container will also have its capabilities(7) altered, these are permissions
that a user must have before the kernel will do anything. All root users have
some set of these capabilities, such as CAP_SYS_ADMIN, and without the correct
capabilities the kernel will just flat out refuse to do whatever is asked of it.
One thing I found pretty interesting is that if you run Docker on a Mac you are actually running Docker within a Linux virtual machine, because containers need the Linux kernel to do their thing!
that’s pretty much it
There we have it! Containers. I certainly haven’t covered everything so do start
reading things for yourself, it’s not too complex, armed with the knowledge of
what a container really is and how it works it takes all of the magic out of
things like docker.
Learning this stuff has helped me get a grasp on how a modern development pipeline works, I’m hoping what I’ve laid out here gets you on your way to understanding it too.